How to install an ODBC driver to Exploratory Collaboration Server
To install an ODBC driver to Exploratory Collaboration Server, you can create a customized Docker image based on the default R environment Docker image of Exploratory Collaboration Server.
1. Run a Docker container based on the default r-exploratory Docker image
Run the following command to start a Docker container based on the default r-exploratory Docker image. In this example, we use the Docker image from Collaboration Server version 6.12.3.6. Please replace the version number in the command with the one you are using.
docker run -it r-exploratory:6.12.3.6 /bin/bash2. Install an ODBC driver to the Docker container
With the shell you opened, install the ODBC driver that you want to use on the Collaboration Server. Make sure the ODBC driver works with unixODBC.
As an example, let's add an Amazon Redshift ODBC driver.
Download and install ODBC Driver
If you want to install Amazon Redshift ODBC driver version 2.0.0.1, you can type in the below commands that download ".rpm" file and install it.
curl -O https://s3.amazonaws.com/redshift-downloads/drivers/odbc/2.0.0.1/AmazonRedshiftODBC-64-bit-2.0.0.1.x86_64.rpm && alien -i AmazonRedshiftODBC-64-bit-2.0.0.1.x86_64.rpmInstall text editor
Since we need to update the configuration file as the next step, let's install text editor (vim) as follows.
apt-get -y --no-install-recommends install vimAdd the ODBC driver to ODBC configuration file.
Once installation is done, type the below command.
odbcinst -jAnd this will show you the ODBC configuration file location as follows:
unixODBC 2.3.6
DRIVERS............: /etc/odbcinst.ini
SYSTEM DATA SOURCES: /etc/odbc.ini
FILE DATA SOURCES..: /etc/ODBCDataSources
USER DATA SOURCES..: /root/.odbc.ini
SQLULEN Size.......: 8
SQLLEN Size........: 8
SQLSETPOSIROW Size.: 8
So now you know that /etc/odbcinst.ini is the configuration file for ODBC drivers.
For the Redshift example, the ODBC driver is installed in /opt/amazon/redshiftodbcx64 so add the entries to /etc/odbcinst.ini file.
Open the odbcinst.ini file with the Text Editor (Vim) you just installed.
vim /etc/odbcinst.iniand add the below at the bottom of the file and save it.
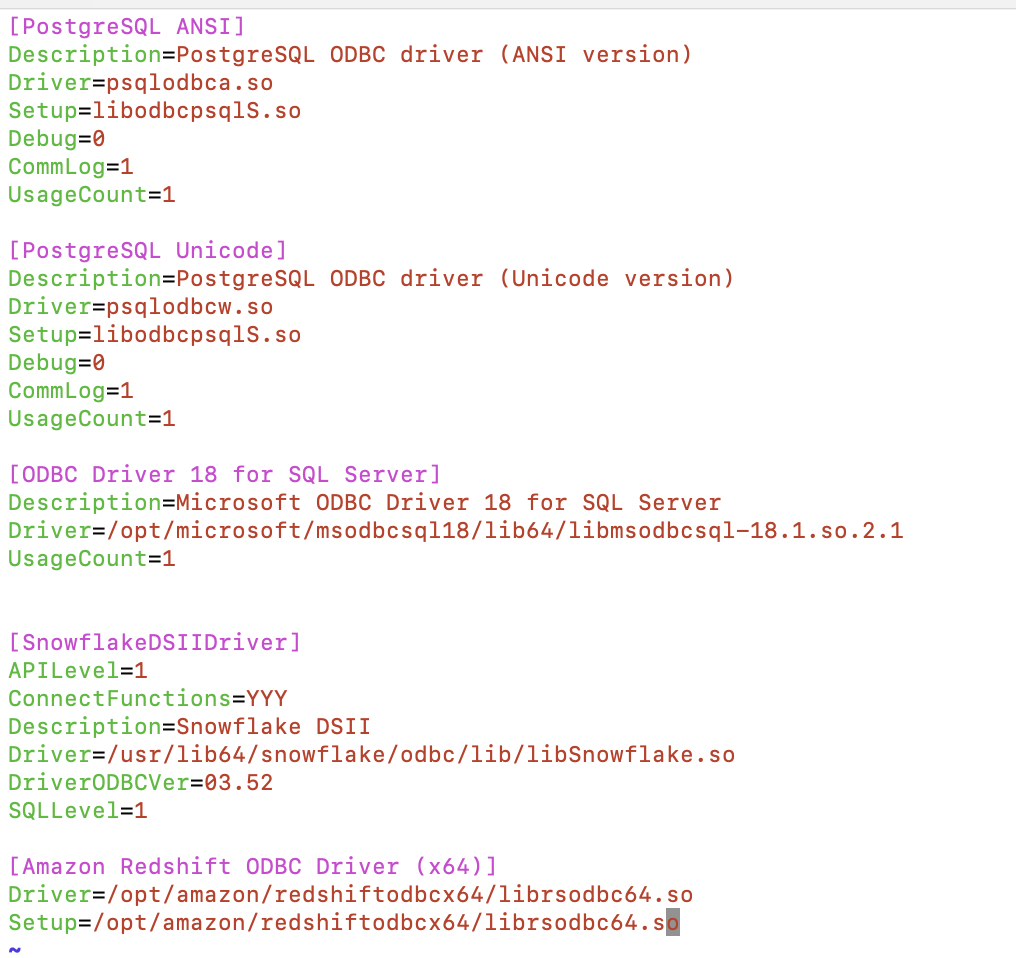
[Amazon Redshift ODBC Driver (x64)]
Driver=/opt/amazon/redshiftodbcx64/librsodbc64.so
Setup=/opt/amazon/redshiftodbcx64/librsodbc64.so
And now the /etc/odbcinst.ini file looks like this.
3. Create a customized Docker image based on the container
Open another shell on the host Linux machine, and run the following command to find the ID of the Docker container we just ran and made the modifications on.
docker psThe above command should give the table that looks like the following as the output.
CONTAINER ID        IMAGE                    COMMAND         PORTS
aad6f8d956a9        r-exploratory:6.12.3.6   "/bin/bash"    6311/tcp
Find the Container ID for the Docker container from the table. In this case, it's aad6f8d956a9.
With the ID, you can now create a Docker image with the modifications. Here, let's give the new image the customized version number 6.12.3.6.1.
docker commit -c 'CMD ["R", "-e", "Rserve::run.Rserve(remote=TRUE)"]' -c 'EXPOSE 6311' aad6f8d956a9 r-exploratory:6.12.3.6.14. Verify that the new Docker image has your changes
Start a Docker container with the new Docker image you just created.
docker run -it r-exploratory:6.12.3.6.1 /bin/bashStart R in it.
RIn the R's command-line interface, type in odbc::odbcListDrivers() and you can verify that the ODBC driver is recognized as follows.
> odbc::odbcListDrivers()
                                name        attribute
1                    PostgreSQL ANSI      Description
2                    PostgreSQL ANSI           Driver
3                    PostgreSQL ANSI            Setup
4                    PostgreSQL ANSI            Debug
5                    PostgreSQL ANSI          CommLog
6                    PostgreSQL ANSI       UsageCount
7                 PostgreSQL Unicode      Description
8                 PostgreSQL Unicode           Driver
9                 PostgreSQL Unicode            Setup
10                PostgreSQL Unicode            Debug
11                PostgreSQL Unicode          CommLog
12                PostgreSQL Unicode       UsageCount
13     ODBC Driver 18 for SQL Server      Description
14     ODBC Driver 18 for SQL Server           Driver
15     ODBC Driver 18 for SQL Server       UsageCount
16               SnowflakeDSIIDriver         APILevel
17               SnowflakeDSIIDriver ConnectFunctions
18               SnowflakeDSIIDriver      Description
19               SnowflakeDSIIDriver           Driver
20               SnowflakeDSIIDriver    DriverODBCVer
21               SnowflakeDSIIDriver         SQLLevel
22 Amazon Redshift ODBC Driver (x64)           Driver
23 Amazon Redshift ODBC Driver (x64)            Setup
                                                       value
1                      PostgreSQL ODBC driver (ANSI version)
2                                               psqlodbca.so
3                                            libodbcpsqlS.so
4                                                          0
5                                                          1
6                                                          1
7                   PostgreSQL ODBC driver (Unicode version)
8                                               psqlodbcw.so
9                                            libodbcpsqlS.so
10                                                         0
11                                                         1
12                                                         1
13                   Microsoft ODBC Driver 18 for SQL Server
14 /opt/microsoft/msodbcsql18/lib64/libmsodbcsql-18.1.so.2.1
15                                                         1
16                                                         1
17                                                       YYY
18                                            Snowflake DSII
19             /usr/lib64/snowflake/odbc/lib/libSnowflake.so
20                                                     03.52
21                                                         1
22                /opt/amazon/redshiftodbcx64/librsodbc64.so
23                /opt/amazon/redshiftodbcx64/librsodbc64.so
5. Use the customized r-exploratory Docker image from the Collaboration Server
Locate the line in the docker-compose.yml file that specified the Docker image version for the r-exploratory Docker container that looks like the following.
...
  rserve:
    image: r-exploratory:6.12.3.6
...
Modify the version to the one you just created.
...
  rserve:
    image: r-exploratory:6.12.3.6.1
...
Now, restarting the Collaboration Server would make it start using the new R environment with the custom modifications.