An Introduction to MongoDB Query for Beginners

We at Exploratory use MongoDB quite a lot. We store most of the data we have in MongoDB because it’s so easy to store and manage in a way that allows us to keep changing the scheme, which is super critical and essential for startups like us who are constantly experimenting by changing things.
Now having said that, querying MongoDB data is not as straightforward as dplyr or even SQL due to the MongoDB Query’s JSON and JavaScript flavor that makes the queries hard to read and a bit more complicated. Well, of course, you can always import the whole data from MongoDB to R’s in-memory for much easier data exploration with packages like ‘mongolite’, ‘dplyr’, ‘tidyr’, etc. or simply with UI tools like Exploratory (UI for R). However, as you would imagine, that might not be always efficient or even practical sometimes due to the time it takes to download the data and the memory size limit of your PC.
So I’d usually recommend a hybrid approach, which is to use MongoDB Query at a minimal level to extract just the enough data, not the whole, from the database and import it into Exploratory, then do the nitty gritty world of data wrangling there for faster and easier data exploration.
Though you don’t need to be an expert of MongoDB query, knowing just the enough level of MongoDB query will make your entire data wrangling and analysis flow much more smooth and more efficient. Today, I’m going to walk you through the basics of MongoDB query with a bunch of examples so that you can start writing the queries to work with MongoDB data effectively. I’m going to use Exploratory’s UI to demonstrate, but all the examples can be used with any other tools including Mongo Shell.
Before you start
There are a few things you need to know before proceeding further.
Sample Data
I’m going to use MongoDB’s standard sample data called ‘restaurants’ for most of the part. If you don’t have one, here’s an instruction on how to set that up.
The data looks something like below.

And it looks like below in Table view in Exploratory.

MongoDB Connection
In order to access MongoDB in Exploratory, you need to create a connection first. If you are not familiar, take a look at this doc for the details.
Data Limit
In Exploratory’s MongoDB data import dialog, ‘Limit’ parameter is set as ‘100’ by default, which means it will query only the first 100 rows (documents) of the data.

You can change this to other values and eventually you want to set it to ‘All’ once you finalize your queries and are ready for importing the data into Exploratory.
Dot . as part of Column (Field) Names
Column (Field) names don’t need to be surrounded by double quotes in general, though you can still use them if you like. However, when dot(s) is used in the names, which happens when referencing to the nested arrays or documents, then you have to use the double quotes. Let’s say we want to reference a column (or field) called ‘address.coord’, then you want to use double quotes like below.
"address.coord":1Ok, now let’s start.
There are three main components of the MongoDB query.
- Select Columns (Fields) — Projections
- Sort
- Filter — Query
Let’s start by selecting columns (fields).
Select Columns (Fields) / Projections
You can select the columns (or fields) by either keeping them or excluding them explicitly.
Keep Columns
You can simply list up the column names inside the curly brackets. Setting ‘1’ means that it will keep these columns.
{borough:1, cuisine:1, name:1}
_id Column
For some reason, even when we didn’t include ‘_id’ column for Fields parameter, this column is still returned as part of the result data. We can exclude it by explicitly set it to 0 (zero) to get rid of this column.
{"borough":1, "cuisine":1, "name":1, "_id":0}
Remove (Exclude) Elements
We can use 0 (zero) to exclude the columns that we don’t want. This will keep all the other columns in the result.
{"borough":0, "grades":0, "_id":0}
Sorting
You can use ‘Sort’ section to set the sorting rules.
Ascending Order
You can type ‘1’ for the ascending order.
{cuisine:1}
Descending Order
Use ‘-1’ for the descending order.
{cuisine:-1}
Filter / Query
You can set the filtering condition in ‘Query’ section.
There are a variety of filtering operators and also functions you can use. In this post, I’m going to cover the followings.
- First N / Last N Rows
- Equal to / Not Equal to
- Equal / Not Equal to One of Them — IN
- Multiple Conditions with AND / OR
- Text Matching - Contains, Starts / Ends With - Regular Expression
- Is NA (Null) or Not NA
- Filter with Numeric Columns
- Filter with Date/Time Columns
- Filter with Array Columns
- Filter with ‘Array of Documents’ Columns
Extract the First or Last N Rows
Each row (document) includes a unique identifier value under ‘_id’ column so we can use this information to sort the data first then use ‘Limit’ parameter to set how many rows to extract. Setting ‘1’ is to sort by the given column in the ascending order, and ‘0’ is to sort in the descending order. So the below would return the first 1000 rows (documents).
{"_id":1}
And the below will return the last 1,000 rows (documents).
{"_id":-1}
Equal to / Not Equal to
For ‘Equal to’ condition, you can simply type the value for each column. Here, I’m querying the restaurants whose ‘borough’ column values are ‘Brooklyn’.
{borough:"Brooklyn"}
This is equivalent to using ‘$eq’ operator to make it explicit as follows.
{borough:{$eq:"Brooklyn"}}Not Equal to
For ‘Not Equal to’, you can use ‘$ne’ operator.
{borough:{$ne:"Brooklyn"}}
Equal / Not Equal to One of Them — IN
If you want to match with one of the values you list, you can use ‘$in’ operator. It’s basically an equivalent of ‘%in%’ in R or ‘IN’ in SQL. The listed values need to be inside the square brackets as JSON’s array format.
{borough: {$in: ["Brooklyn", "Queens"]}}
The opposite is ‘Not In’, and you can use ‘$nin’ for this.
{borough: {$nin: ["Brooklyn", "Queens"]}}
Multiple Conditions with AND / OR
You can list multiple conditions in Query section followed by ‘,’ (comma). If you want to have them with AND condition, which means all the conditions need to be met, then you can simply list them separated by ‘comma’ like below.
{borough:"Brooklyn", cuisine:"Japanese"}
If you want them with OR condition, which means at least one of the conditions needs to be met, then you can use ‘$or’ operator at the beginning like below.
{$or:[{"borough": "Brooklyn"}, {"cuisine":"Japanese"}]}
Text Matching — Contains, Starts / Ends With — Regular Expression
MongoDB query supports Perl notation of the regular expression. You can simply surround the matching text with ‘/’ (slash) symbols. Note that you don’t need to have the double quotes for the matching text.
For example, if you want to query restaurants whose names include ‘Deli’ you can type something like below.
{name: /Deli/}
More specifically, if you want the restaurants whose names starting from ‘Deli’, then you can use ‘^’ (Circumflex Accent) right before the matching text.
{name: /^Deli/}
If you want to query the restaurants whose names ending with ‘Deli’, then you can use ‘$’ (dollar sign) at the end of the matching text.
{name: /Deli$/}
Filter with Logical (Boolean) Column
Equal to true (false)
You can use '$eq' operator.
The values of the logical (or boolean) column are 'true' and 'false' are they are special ones that don't require the double quote to surround. It can be something like the below.
{isCustomer:{$eq:true}}Not Equal to true (false)
For ‘Not Equal to’, you can use ‘$ne’ operator.
{isCustomer:{$ne:true}}Filter with NA
Is NA (Null) or Not NA
Sometimes your data might contain NA (or Null) like below.

Is NA (Null)
If you want to query only the data with NA (or null) in some columns, you can use ‘null’ as the condition like below.
{bytesIn: null}
This will return the rows with ‘bytesIn’ column having NA (or Null) values, and this means that the column (or field) itself doesn’t exist for those rows. This is one big difference between MongoDB and the relational databases. The scheme in MongoDB can change like this by row (document) while it never changes by row in the relational databases! ;)
Not NA (Null)
And if you want to query only the data without NA in some columns, you can use ‘$ne’ (Not Equal) operator with ‘null’ like below.
{bytesIn: {$ne: null}}
Column (Field) Exist / Not Exist
This is similar to the above ‘Is NA / Not NA’, but you can use ‘$exists’ operator to check whether some specific columns (fields) exist or not. So if you want to query only the rows (documents) that have ‘bytesIn’ column (field), then you can type something like below.
{bytesIn: {$exists: true}}
Or, if you want the opposite, which means you want to query only the rows (documents) without ‘bytesIn’ column (field), you can simply set ‘false’ like below.
{bytesIn: {$exists: false}}
These are very useful especially when you had added extra fields in your data collection and want to query only the data with those new fields.
Filter with Numeric Columns
You can use the following operators for ‘Greater / Less than’ conditions.
- $gt — Greater than
- $gte — Greater than or equal to
- $lt — Less than
- $lte — Less than or equal to
For this example, I’m switching to a sample log data.
Let’s say we want to query the rows (documents) whose ‘bytesIn’ column (fields) values are greater than 500,000, we can type something like this.
{bytesIn: {$gt: 500000}}
Between
If we want to get the ones whose ‘bytesIn’ values are between 500,000 and 700,000, then simply add ‘less than’ condition after the ‘greater than’ condition followed by ‘,’ (comma) like below.
{bytesIn: {$gt: 500000, $lt: 700000}}
Multiple Conditions
Just like we saw for filtering on Text columns (fields), we can list multiple conditions like below for numeric columns as well.
{bytesIn: {$gt: 500000, $lt: 700000}, rowsIn: {$gt: 1000}}
This is to extract the rows whose ‘bytesIn’ values are between 500,000 and 700,000, and ‘rowsIn’ values are greater than 1000.
Filter with Date / Time Columns
Just like we have done with the numeric columns, we can also query the data with conditions on Date / Time data columns with operators like below.
- $gt — Greater than
- $gte — Greater than or equal to
- $lt — Less than
- $lte — Less than or equal to
But the tricky thing about querying with Date / Time data is that we need to convert the input text such as “2017–04–12” to Date / Time object. You can do this by using ‘Date’ function.
Date
Let’s say we want to query the events that are after April 12th, 2017. We need to convert an input text of “2017–04–12” to Date object by using ‘Date’ function first, then use ‘$gte’ (Greater than or equal to) operator to create the condition.
{startedAt : { $gte : new Date("2017-04-12")}}
Date and Time
Now if we want to set the time along with the date, then we can use ‘T’ to connect the Date and Time portions. This is so-called ‘canonical date/time format’.
{startedAt : { $gte : new Date("2017-04-12T15:00:00")}}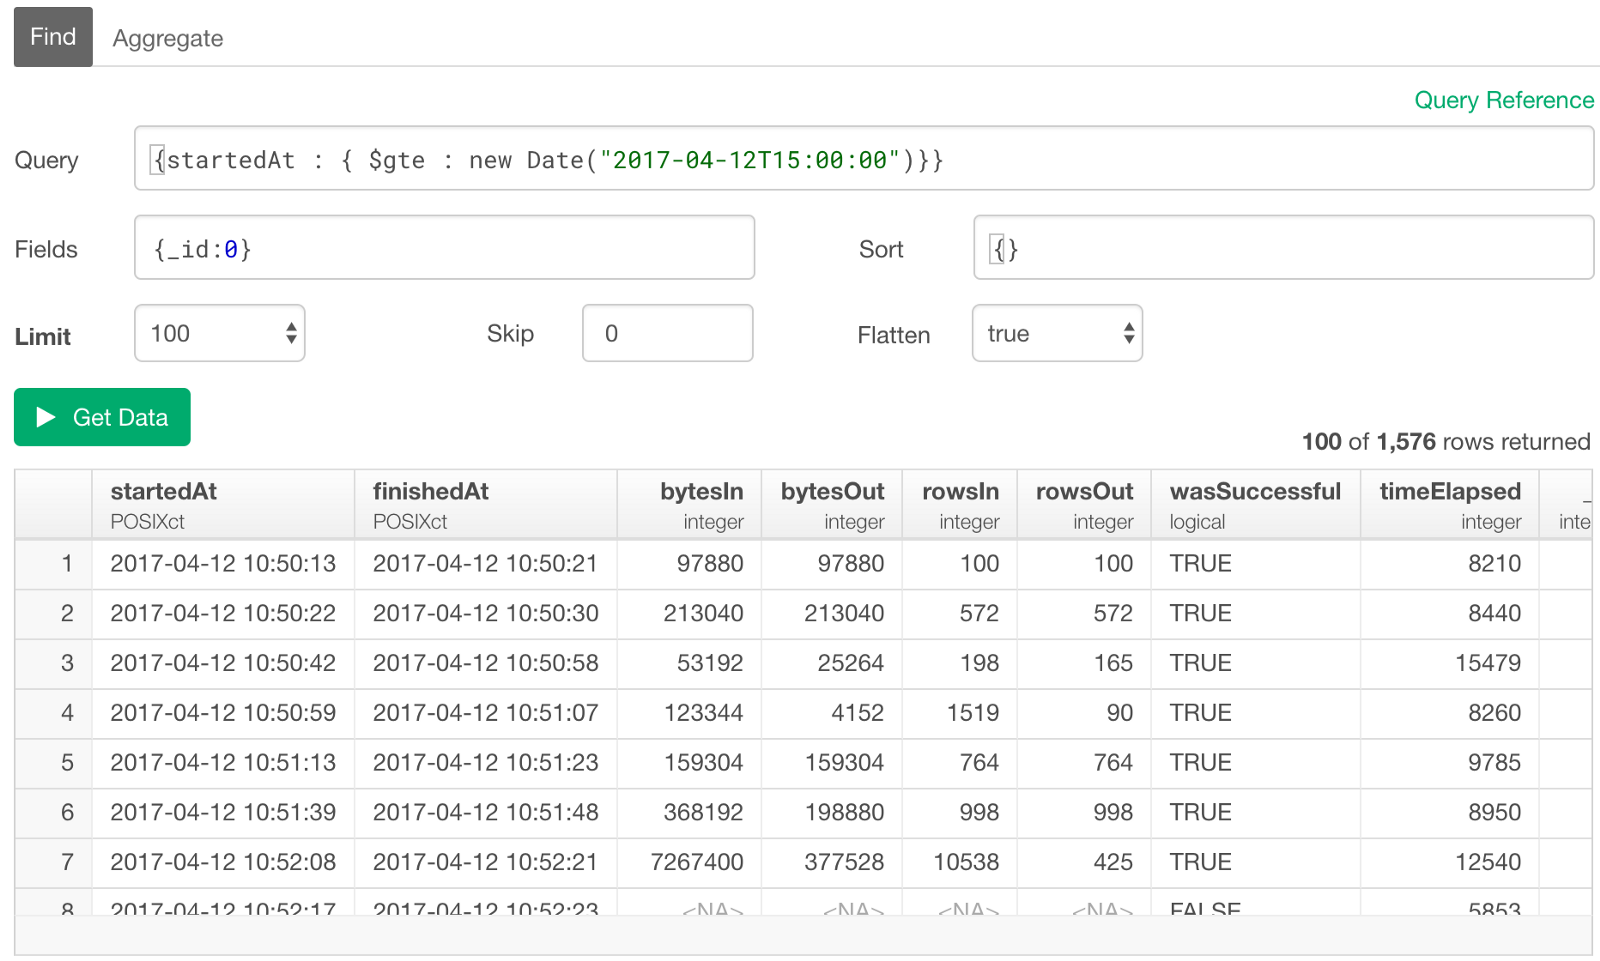
With Timezone
As you might have noticed though, the above result data is showing the ones that are actually before “2017–04–12 15:00:00”. This is because the data inside the database is stored in UTC (Coordinated Universal Time) so the input date/time value was treated as UTC, but the result in the preview table is shown as the local time, in this case, that happens to be Pacific Timezone. We can set the timezone for the input value by setting the difference between UTC and the local time zone (PDT — Pacific Daylight Time) at the end like below.
{startedAt : { $gte : new Date("2017-04-12T15:00:00-07:00")}}
Between Two Dates / Times
If you want to query the data between two dates or times, then simply add two conditions, one is for ‘greater than and equal to’ and another is for ‘less than and equal to’, for example.
{"startedAt":{ $gte: new Date("2017-04-12T15:00:00-07:00"), $lte: new Date("2017-04-12T18:00:00-07:00")}}
Last N Days / Weeks / Months / etc
Probably the most common way to filter the data based on Date / Time values is to create conditions for the last ’n’ number of days, weeks, months, etc. For example, if we want to query for the events that are logged in the last 24 hours, we can do something like below.
{"startedAt":{$gte: new Date(Date.now() - 24*60*60 * 1000)}}
‘Date.now()’ function returns the current time. And we can subtract the 24 hours in a millisecond unit from the current time.
24 (hours) * 60 (minutes) * 60 (seconds) * 1000 millisecondsThis will give us a time of 24 hours ago from now.
If we want to get the data for the last 5 days, you can simply multiply 5 to the above, so it would be something like below.
{"startedAt":{$gte: new Date(Date.now() - 5*24*60*60 * 1000)}}Filter on Array (List) Columns
When you have the arrays in your data, you can still filter but it’s slightly different the way it works given the fact that the arrays contain multiple values.
There are two types of Array. One if Array of Values and another Array of Documents, and they look like below.
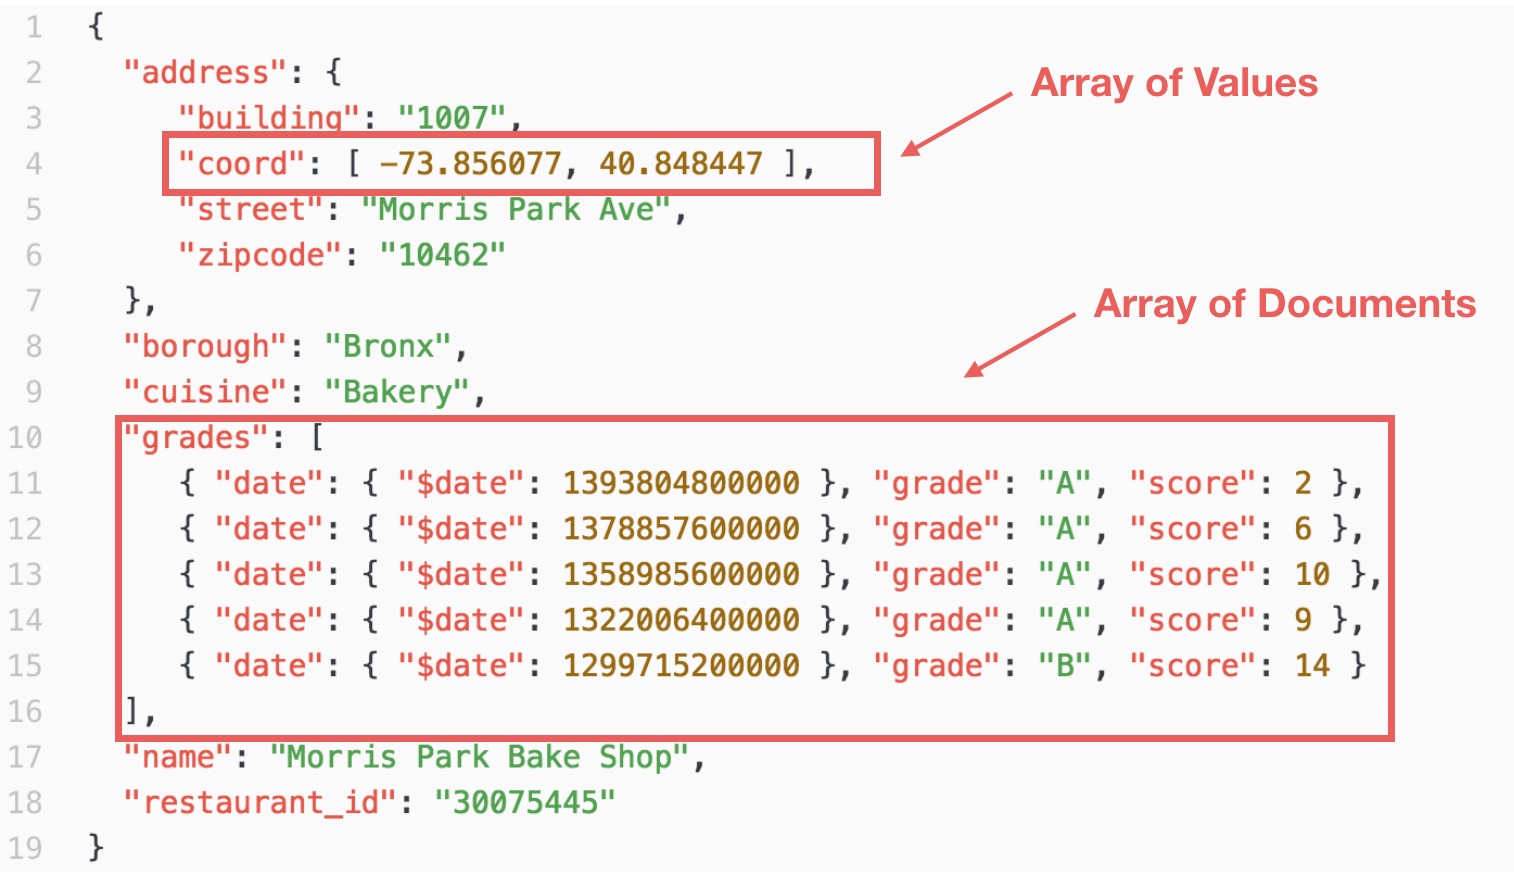
Here, let’s look at Array of Values first. I’ll talk about Array of Documents in the next section.
Now, when we show the above data in the preview table it would look something like below.
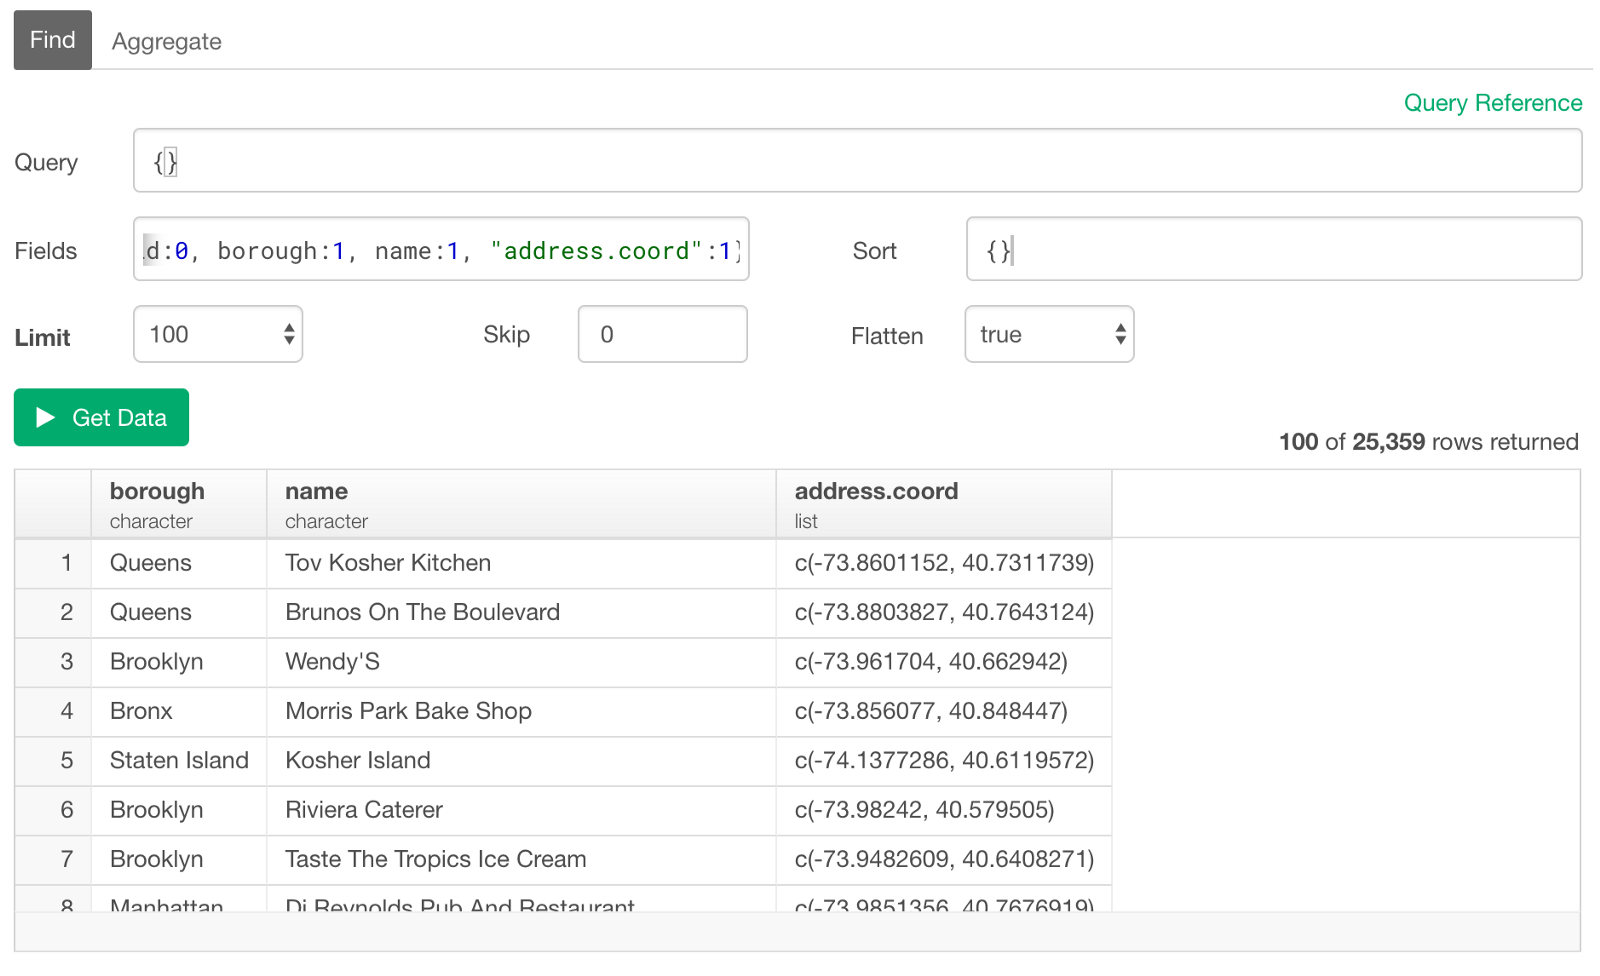
Any array data would be presented as the ‘list’ data type in R and Exploratory. And the ‘coord’ field nested under ’address’ field in the original data is now presented as ‘address.coord’ column in the preview table. By the way, this column contains the geo-coordinate information (longitude and latitude) of each restaurant.
Greater than
Now, if we want to query the restaurants whose ‘address.coord’ values are greater than 41 you can type something like below.
{"address.coord": {$gt:41}}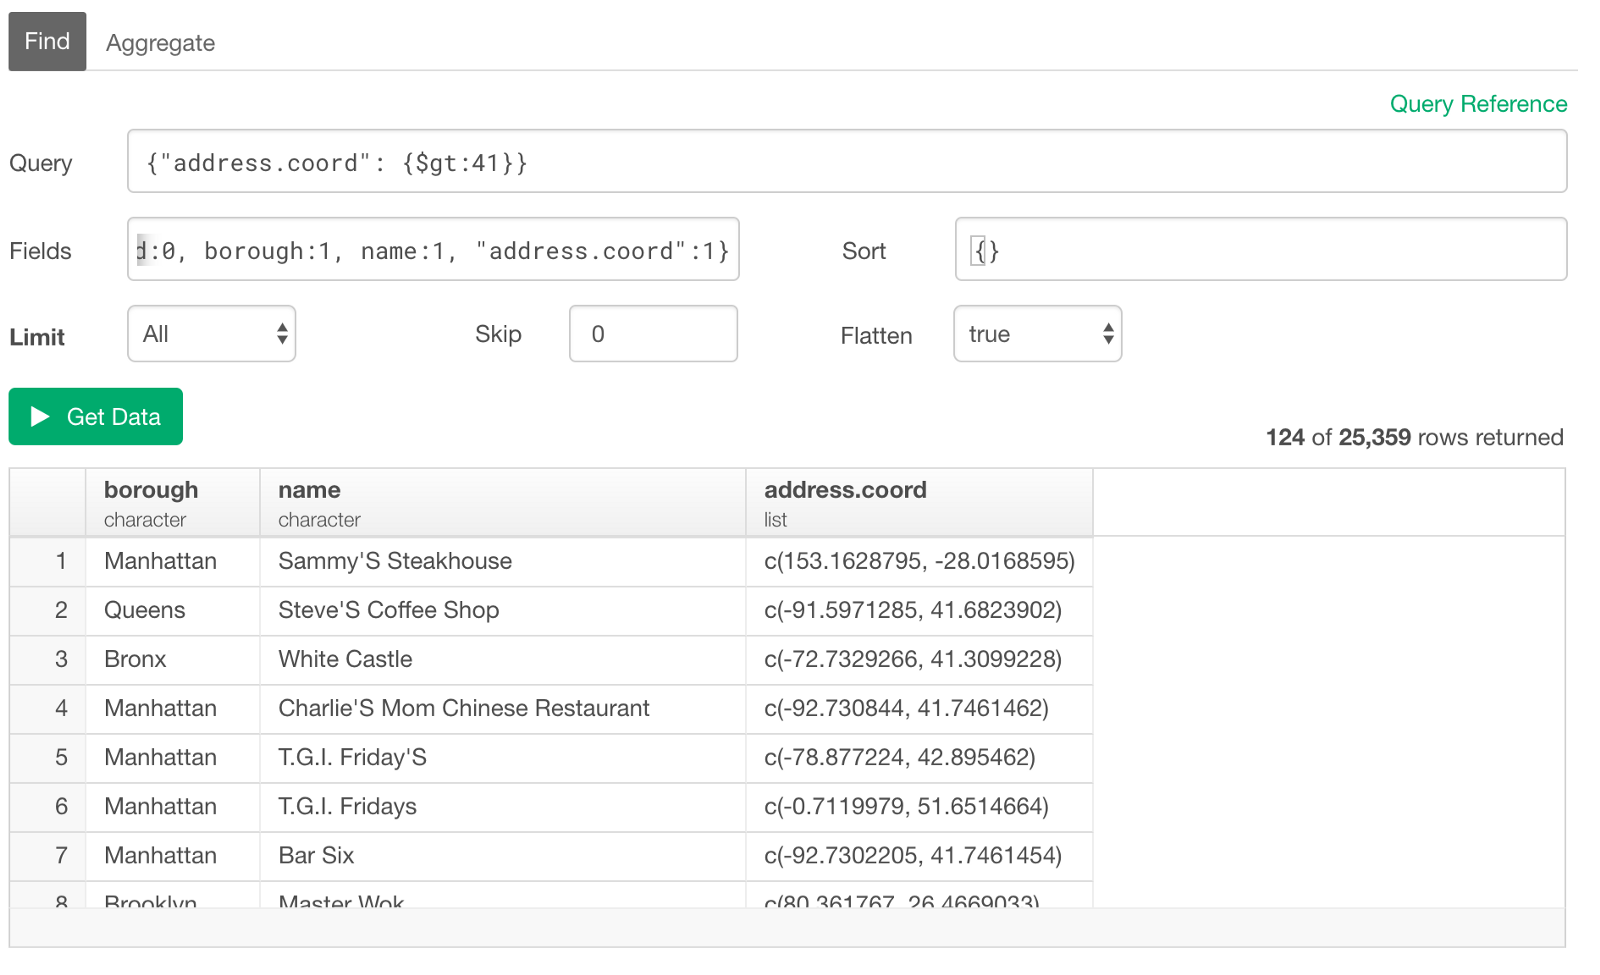
This query condition is actually testing all the values inside of each list and it would return TRUE as long as one of them (longitude or latitude) meets the condition. For example, the first row above is returned because the first value of ‘153.1628795’ meets the condition even though the second doesn’t. But for the second row, it’s returned because the second in the list meets the condition even though the first doesn’t.
Multiple Conditions
As we have already seen at above, we can list multiple conditions even for Array data. For example, we want to query the restaurants whose geo-coordinate values are greater than 41 and less than -60. You can add multiple conditions followed by ‘,’ (comma).
{"address.coord":{$gte:41, $lte:-60}}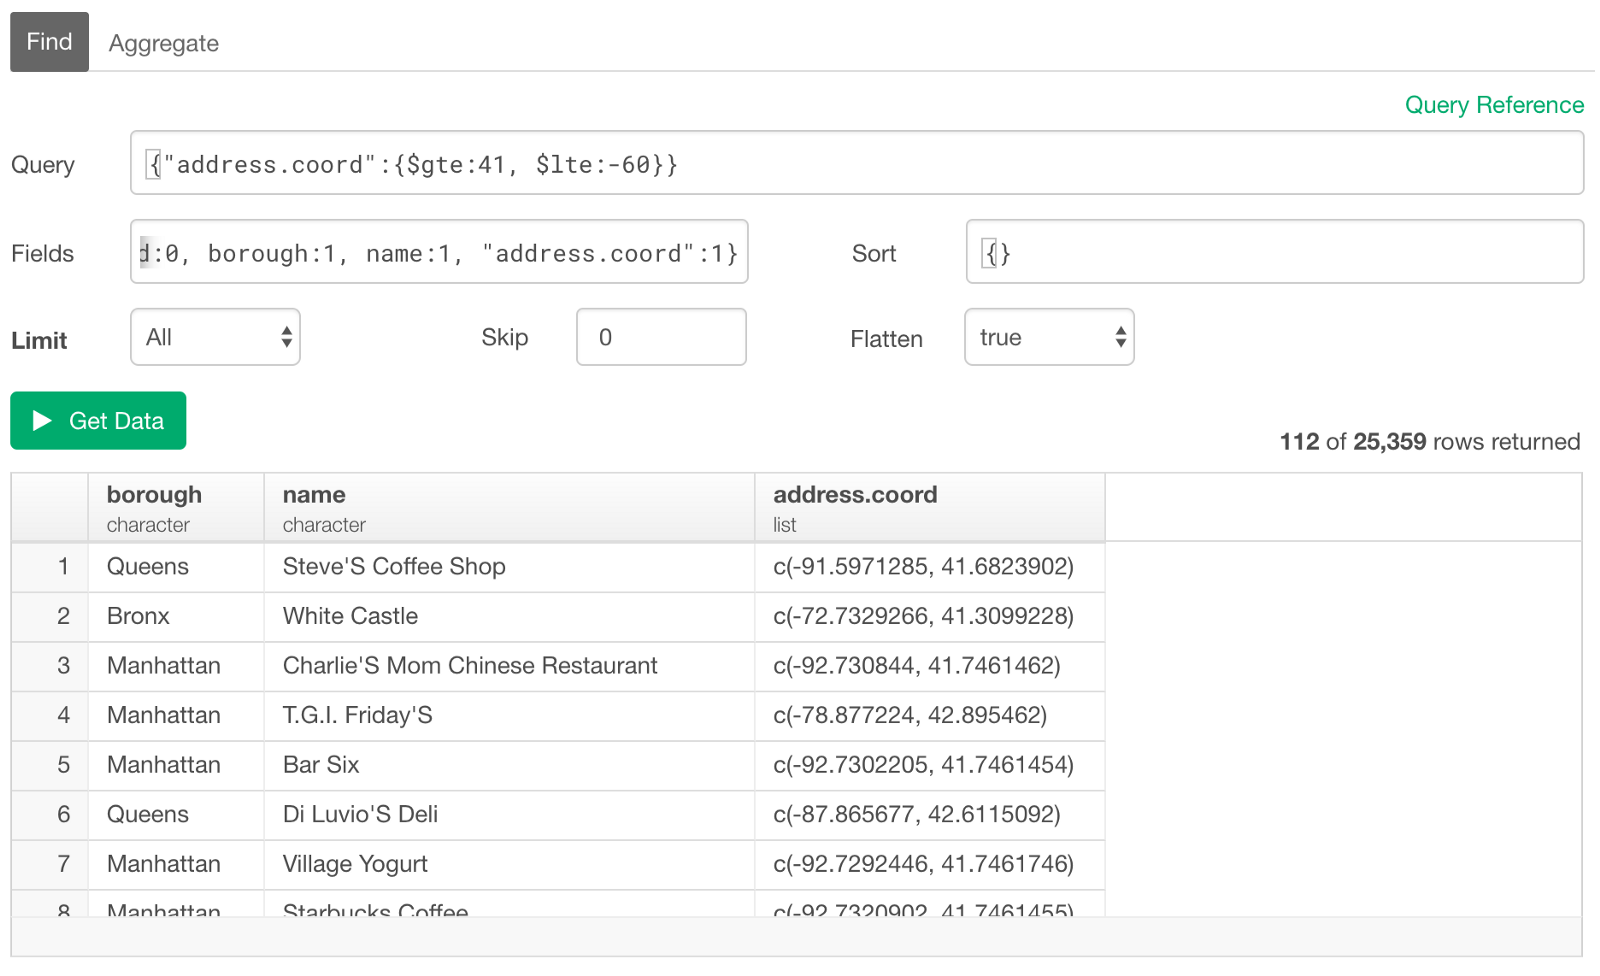
This checks each condition for each value in the list. And if all the conditions are satisfied by at least one of the values in a given list then the corresponding row will be returned.
Element Match
But sometimes you might want to have such multiple conditions to be satisfied by the same value in the list, instead of any values in the list. In such case, we can use ‘$elemMatch’ function.
For example, let’s say we want to query the restaurants one of whose coordinate values are greater than 40 and less than 41.
{"address.coord":{$elemMatch: {$gte:40, $lte:41}}}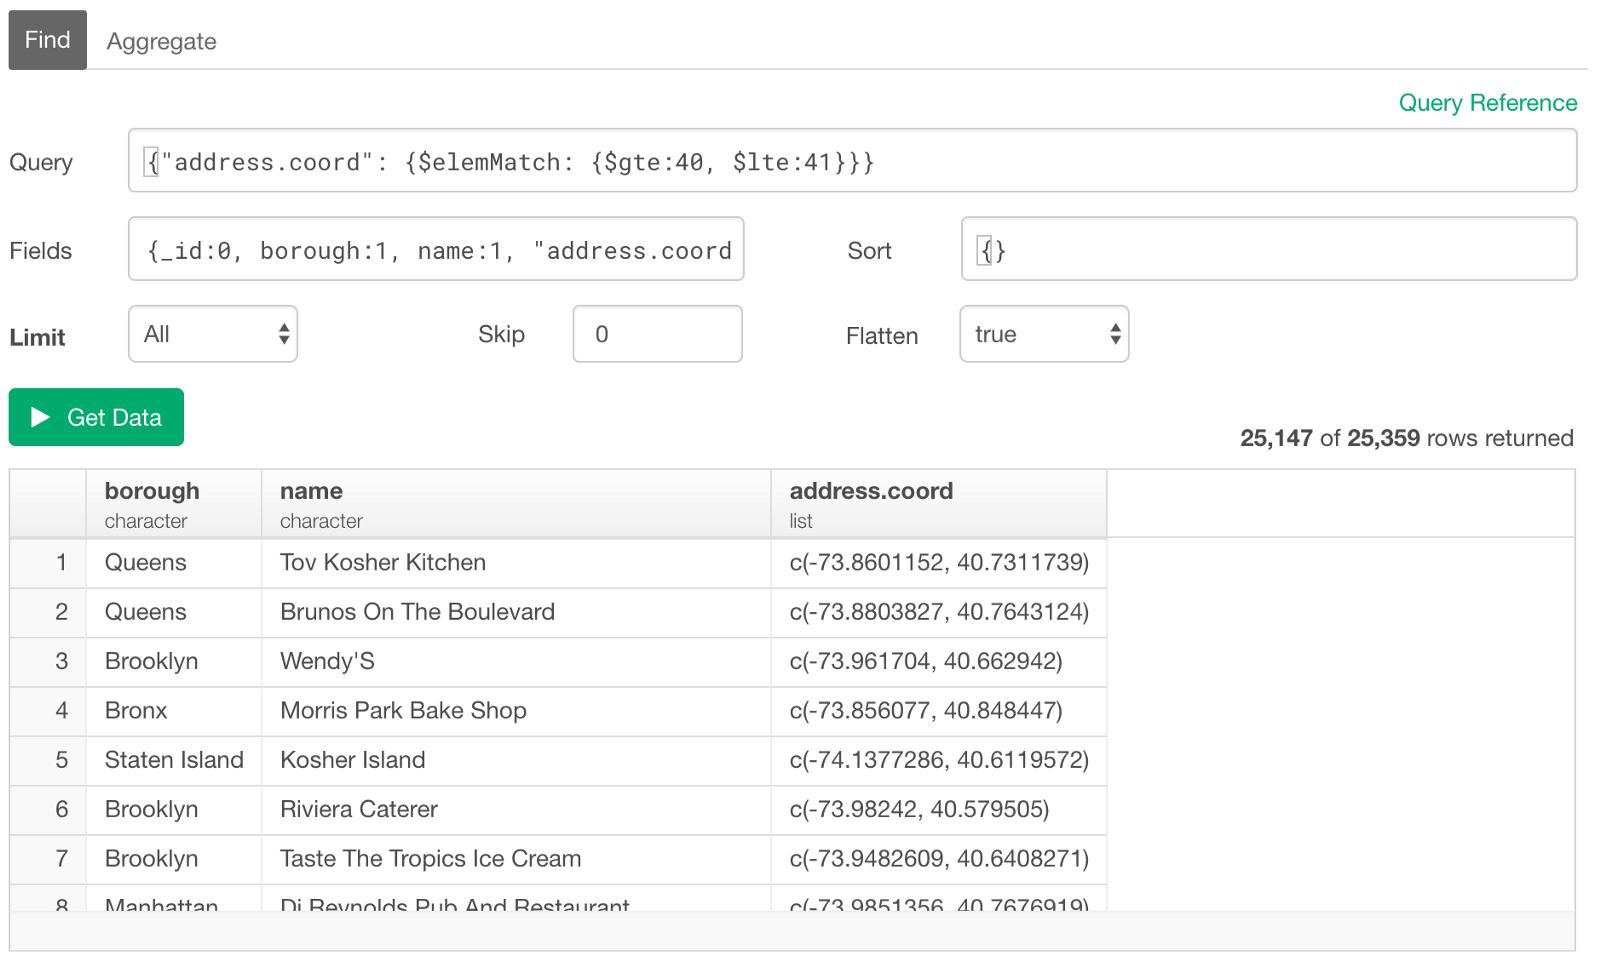
Now the above multiple conditions were tested for each value in the list. So as long as one of the values in the list in a given row satisfies those conditions simultaneously, then the row will be returned. It still doesn’t matter which one in the list.
Match with Values at Exact Position
Now, sometimes you might want to specify which position in the list to be evaluated for a given condition(s). In such case, you can use the dot notation and the position (index) number.
For example, let’s say we want to query the restaurants whose ‘latitude’ of the geo-coordinate location are greater than 40 and less than 41. Since we know that the latitude is the 2nd value inside the list for this dataset we can use 1 as the position. (MongoDB query uses ‘zero-based indexing’, which means it starts with 0.)
{"address.coord.1": {$gte:40, $lte:41}}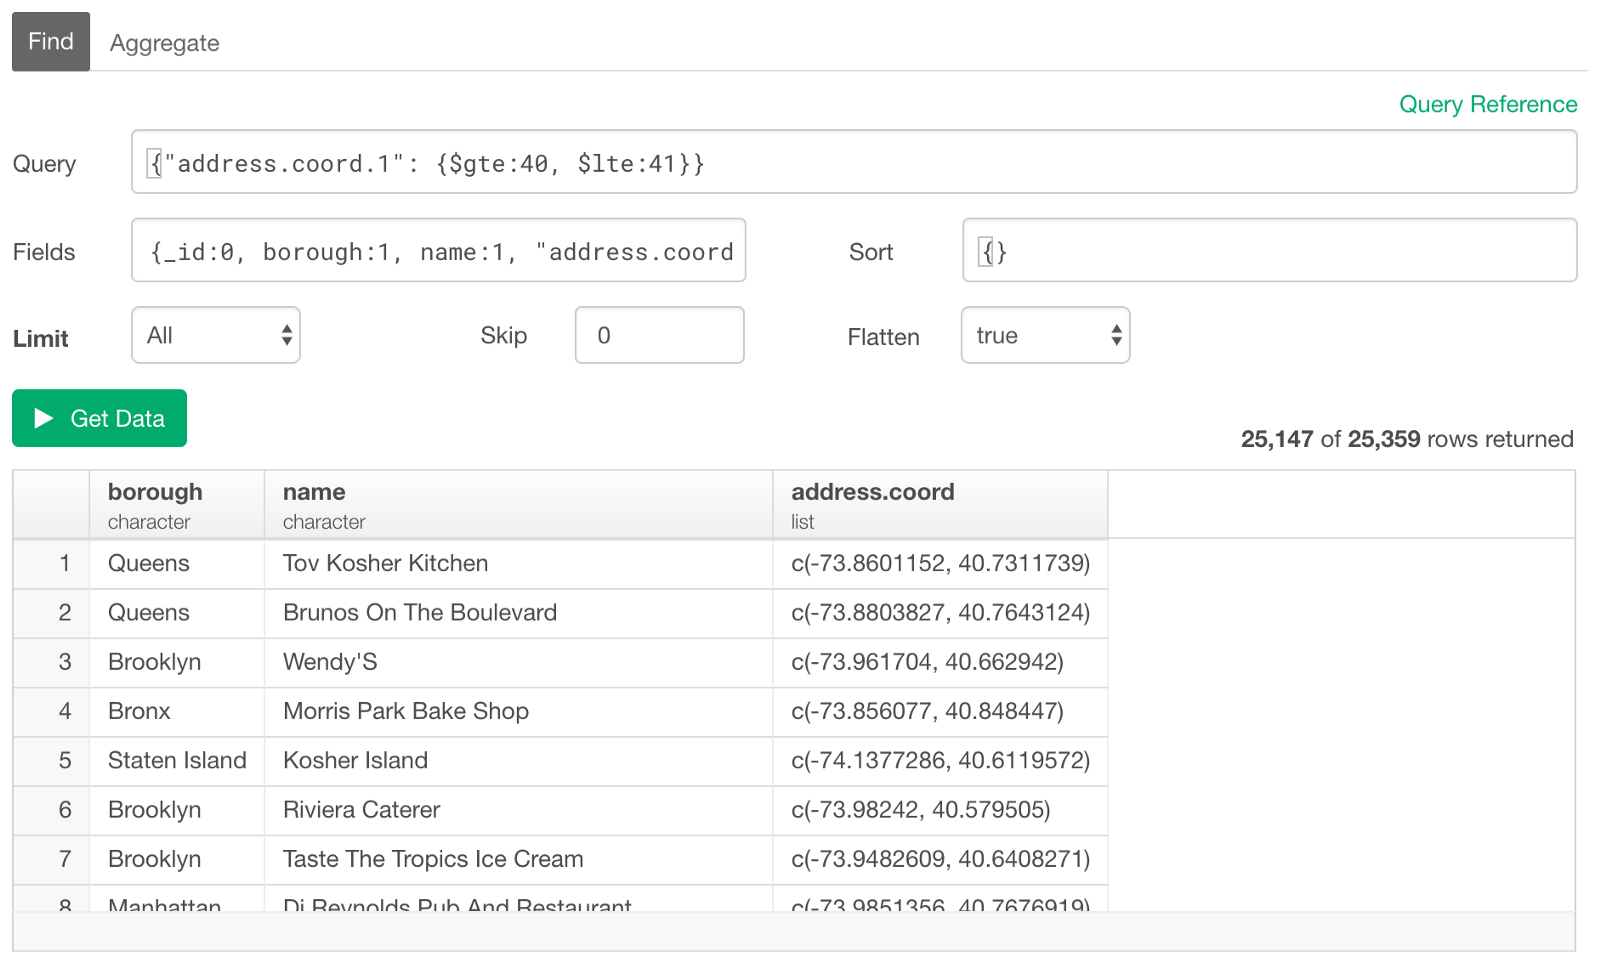
Query an Array by its Length
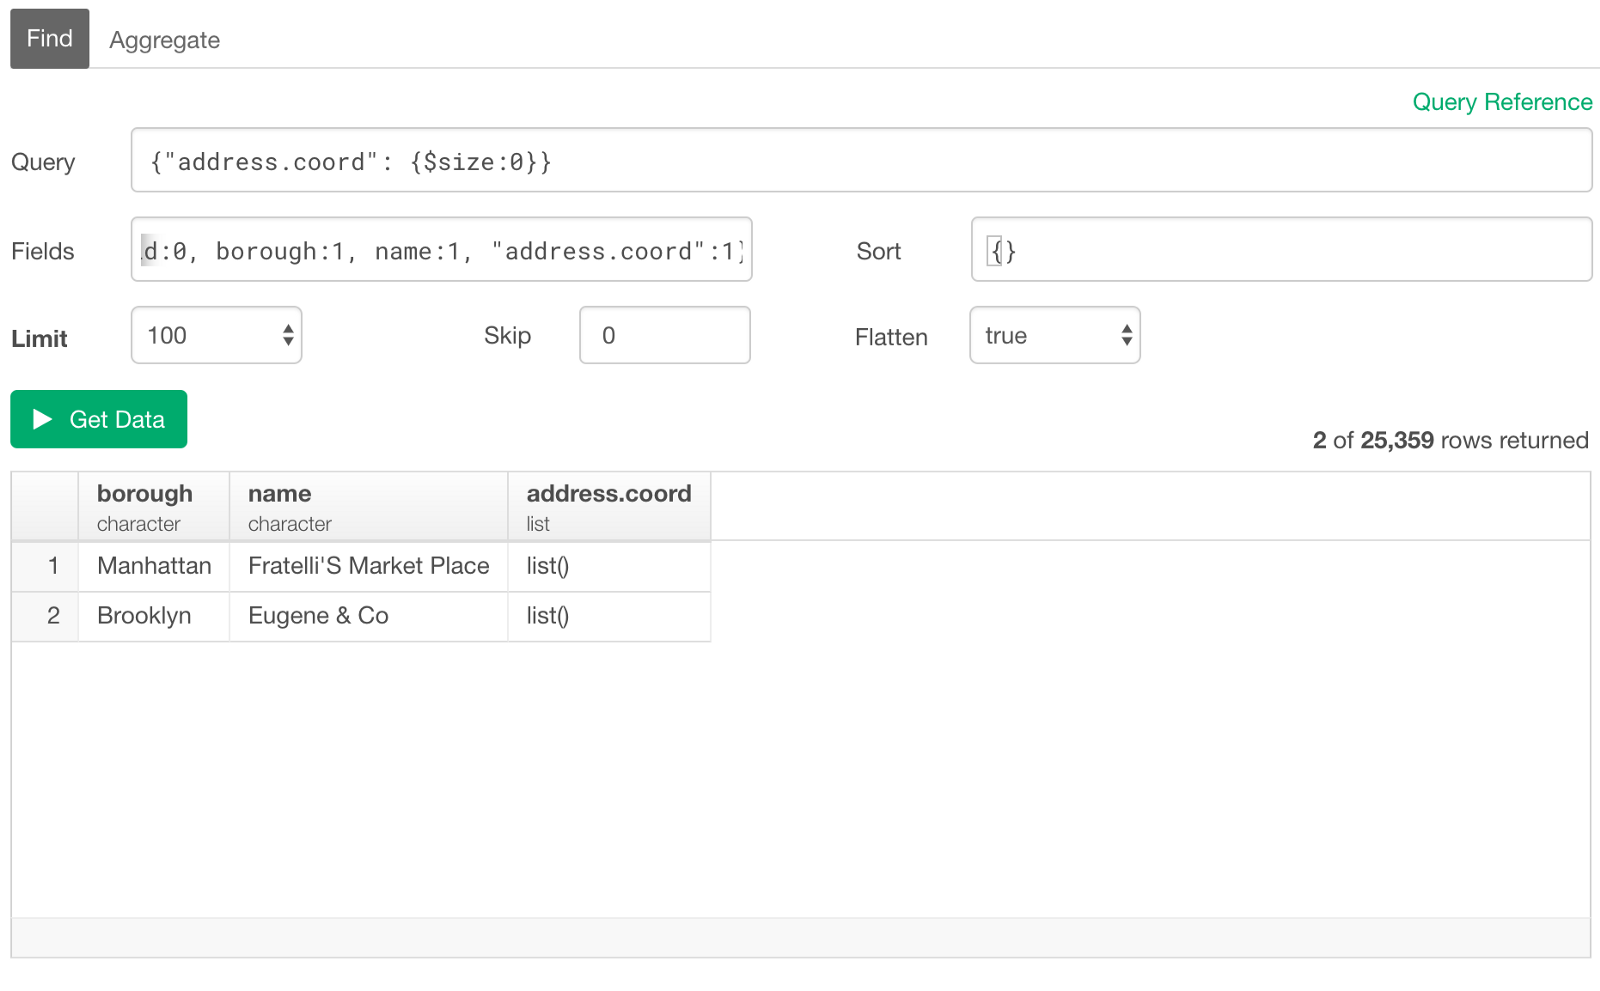
If we want to create conditions based on how many elements inside the array, we can use the $size operator. For example, the following query returns the rows whose ‘address.coord’ always contain two values.
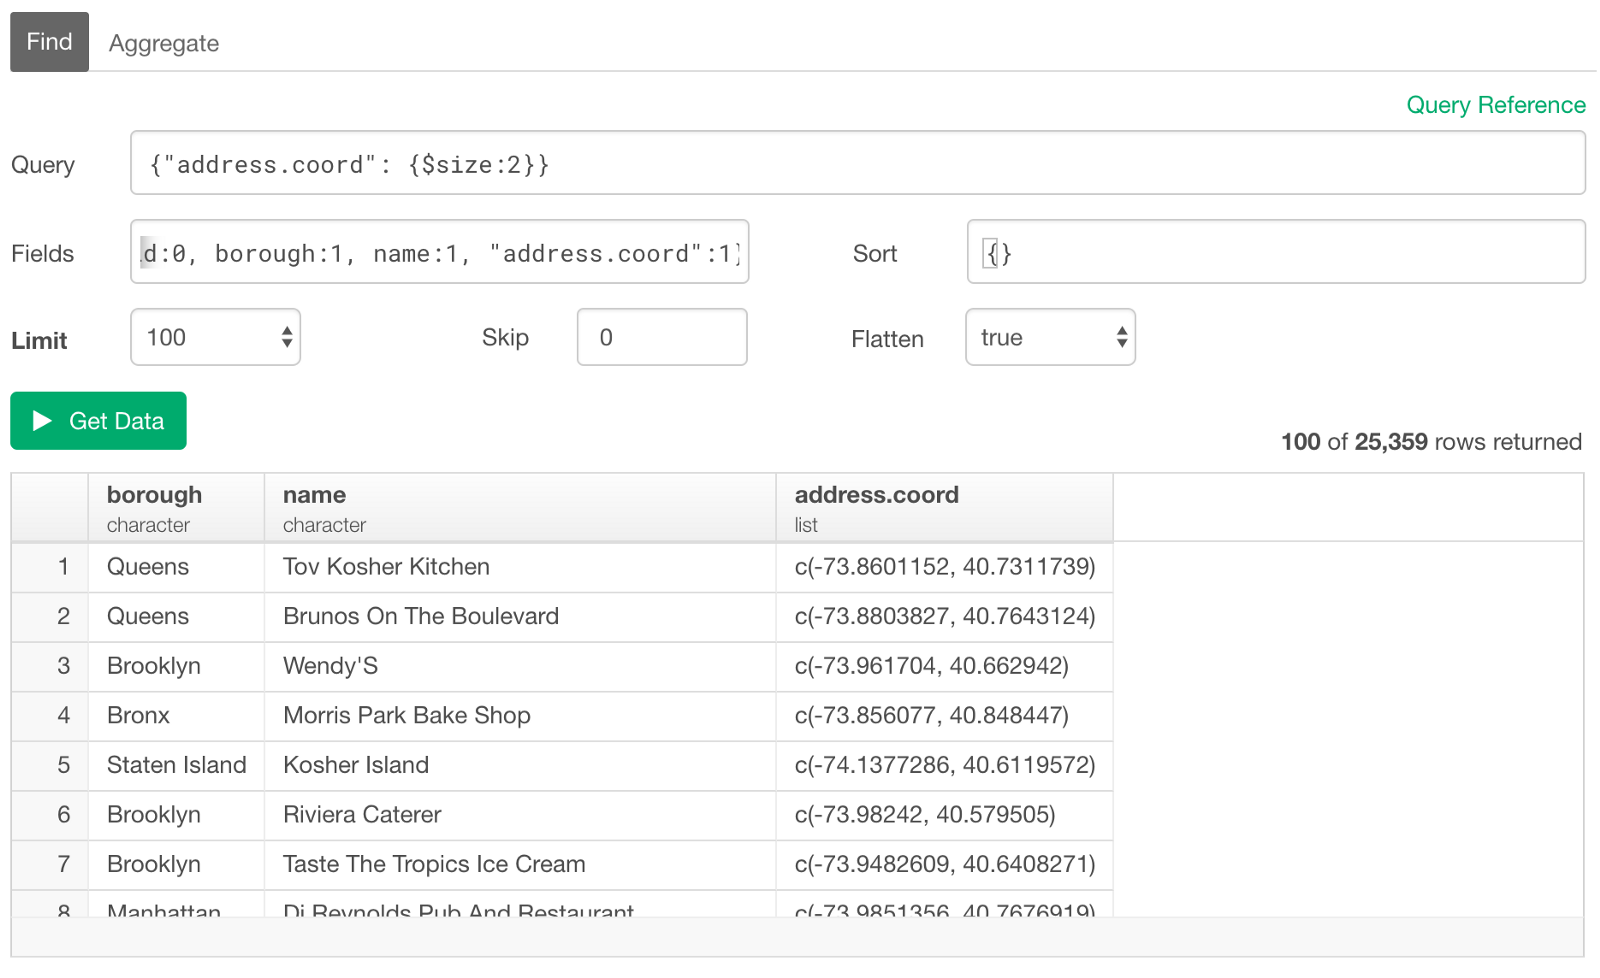
This can be convenient when you want to check if there is any data that doesn’t have any values in the array (or list).
Filter on ‘Array of Documents’ Columns
We have looked at a simple array data so far, but you can also do the similar thing for Array of Documents.
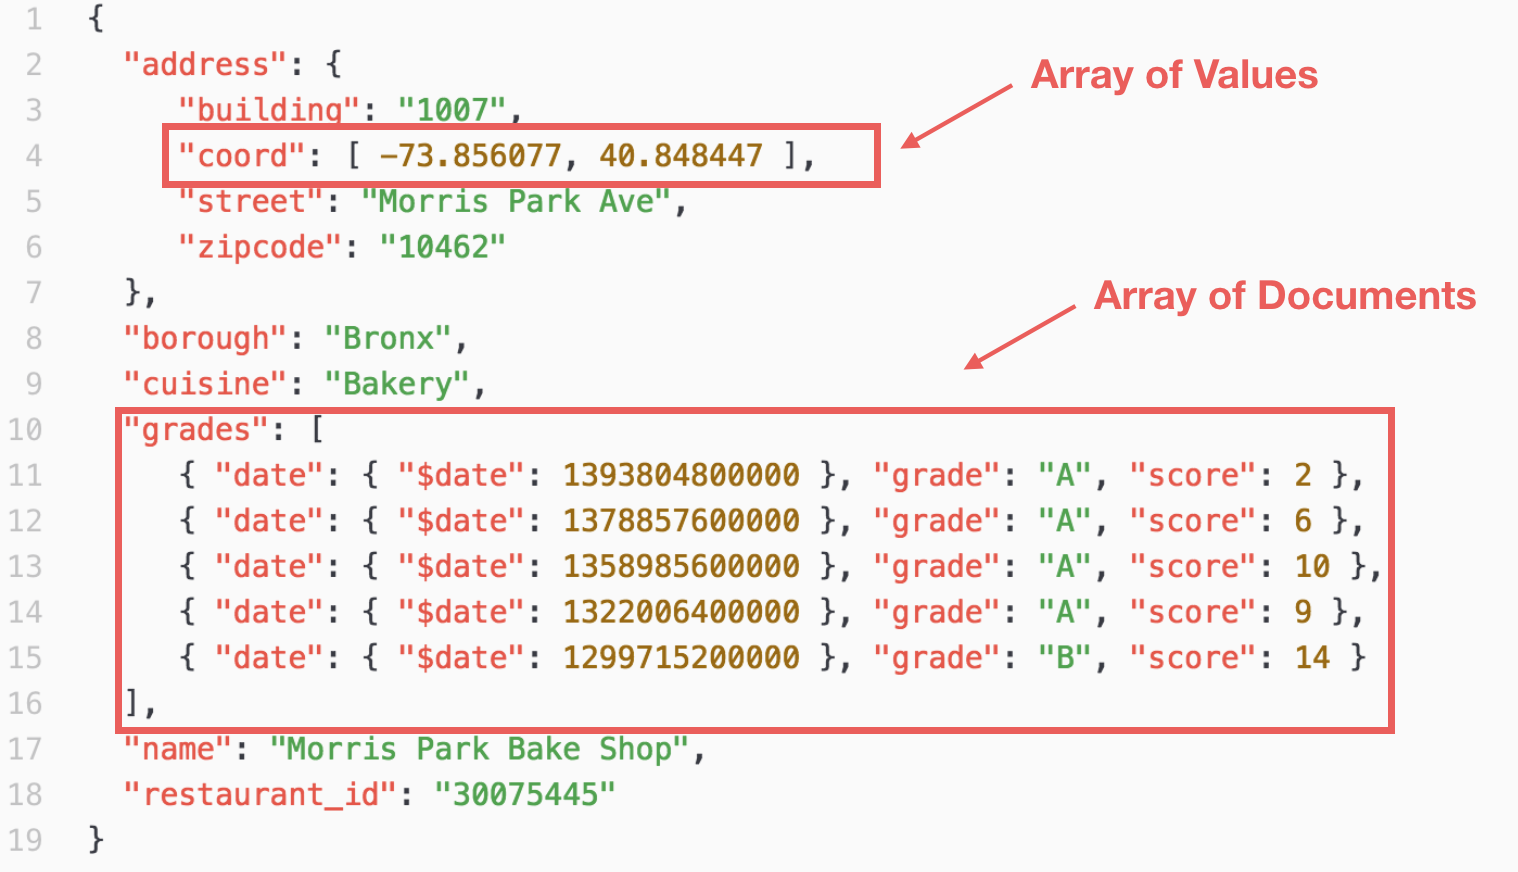
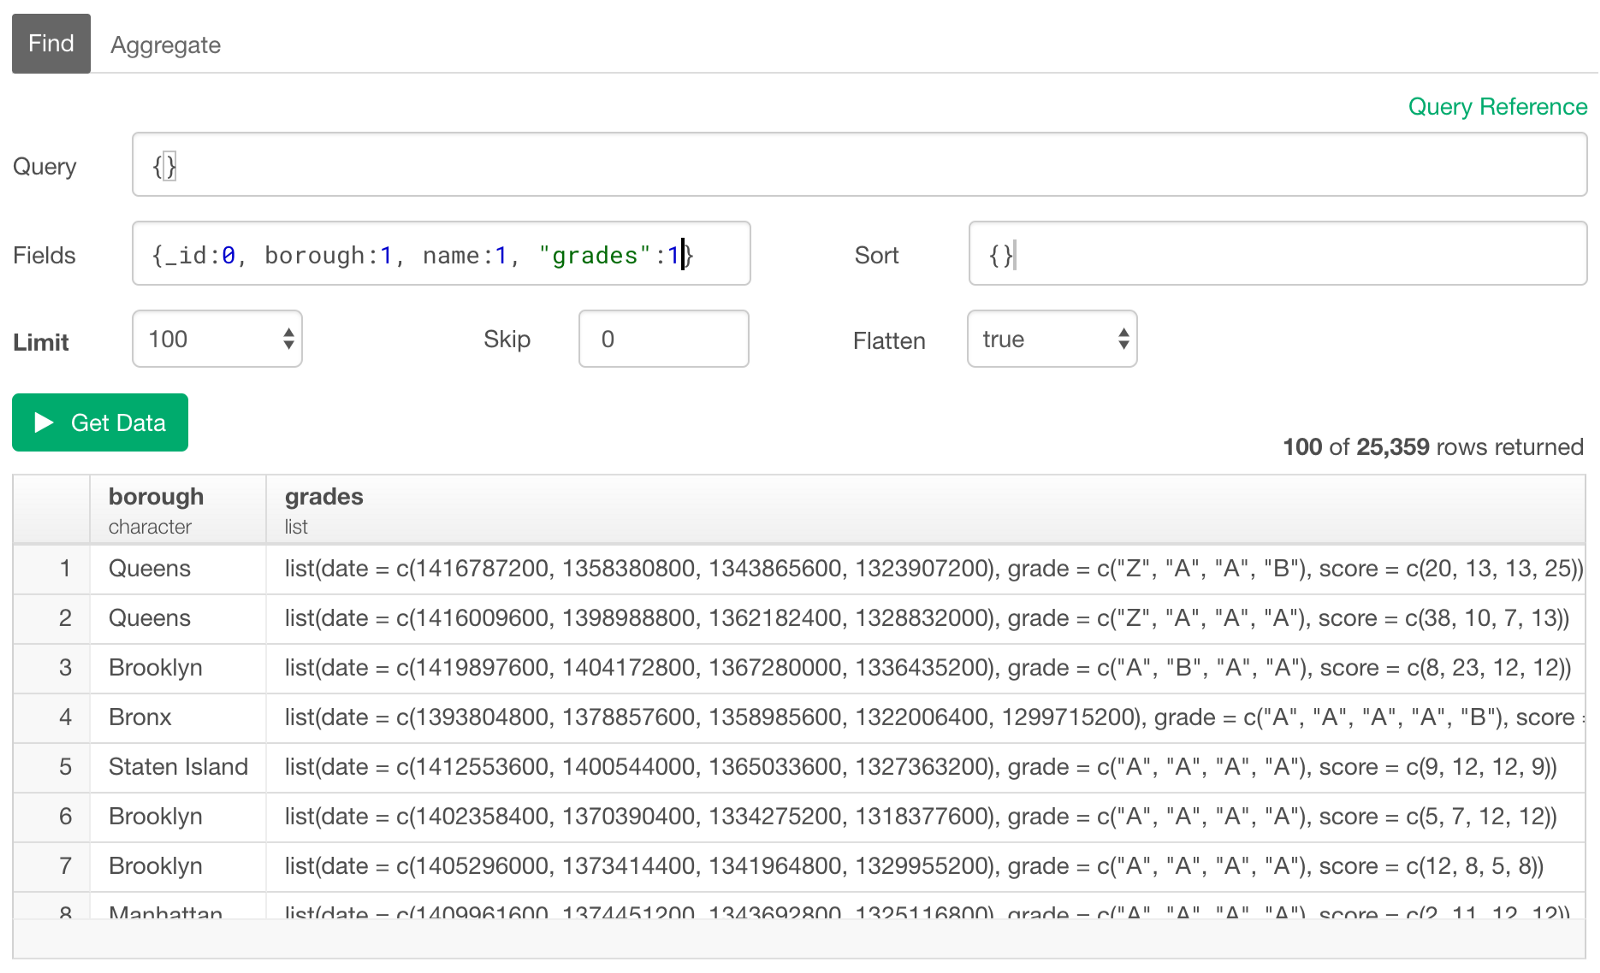
In R and Exploratory, this type of data is presented as a list of data frames.
Here, we have a column called ‘grades’ that has a nested documents with three fields — date, grade, and score — in each row.
Now let’s say we want to query the restaurants who was graded as “A” in any year of the evaluation. We can use the ‘dot’ notation and reference the ‘grade’ field inside the nested list like below.
{"grades.grade": "A"}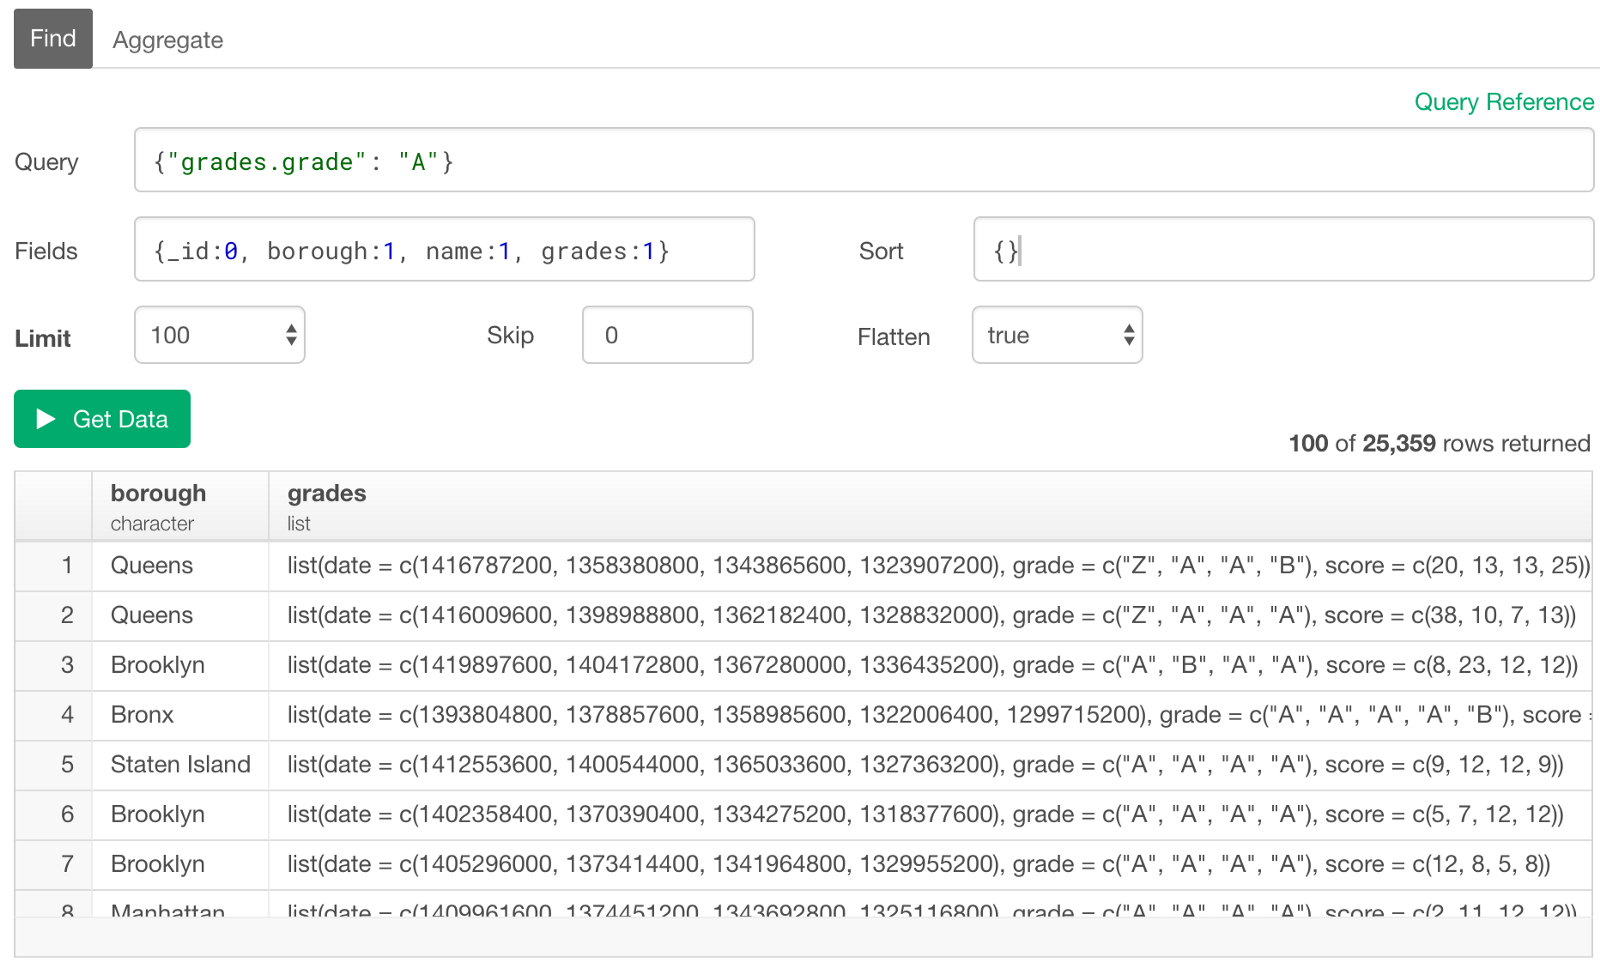
Use the Array Index to Query for a Field in the Embedded Document
There are several rows (documents) inside each of the nested lists (arrays) and the above condition was actually tested for any of the ‘grade’ field values in each row. Now let’s say we want to test the condition to a field at a particular position. We can use the index number as part of the reference path with the ‘dot’ notation like below.
{"grades.0.grade": "A"}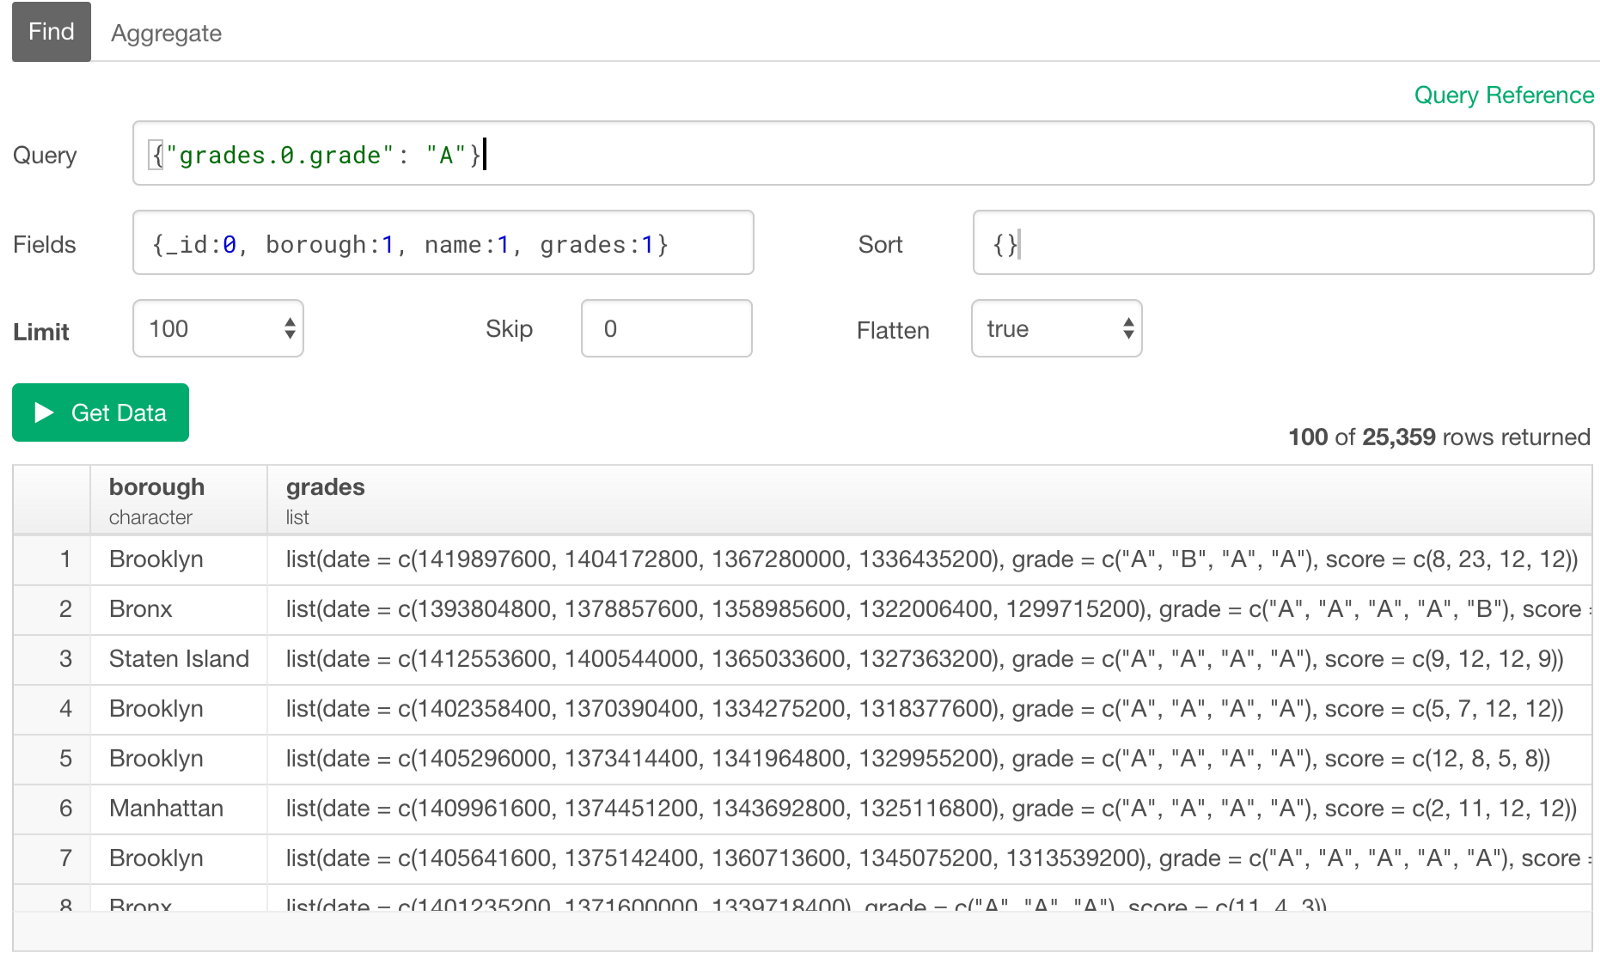
This tests the condition only for the first appearance of the ‘grade’ value inside the nested list in each row. And you can see all the rows above have “A” as the first in the ‘grade’ list.
Of course, there are much more you can do with MongoDB Query. And I haven’t touched another common way to query against MongoDB, which is to use ‘aggregate’ or ‘pipeline’. But that topic itself deserves its own post, so I will find a time to write about it soon.
Anyway, by becoming familiar with MongoDB query even at the basic level, you can employ the hybrid approach of working with MongoDB data. The key is to query against MongoDB to import just enough data for your data exploration and analysis. This will allow you to have enough data to explore and find deep insights by quickly and iteratively transform, visualize, and applying machine learning / statistical models.
Happy MongoDB Query!
Appendix
Reference
These two pages on MongoDB’s document page are pretty good for covering the basics. Especially the one that compares to SQL is very useful if you have SQL background.
R Packages used in this post
- mongolite: Fast and Simple 'MongoDB' Client for R - CRAN Page